If your account is active and your A2P 10DLC registration is approved, you can create and send campaigns. To create an SMS campaign, follow these steps:
Go to Campaigns -> Create New Campaign

Info:
2.1. Name your campaign: Enter your campaign name.

2.2. Select your contacts: Select the contact group/groups you want to use for your campaign from the drop-down.
Note: you can only select verified groups - these are the groups with a blue checkmark to the right of their names.

You can easily find a specific group by entering its name in the ‘Select lists’ field

If you hover over the little ‘i’ icon to the right of each group's name, you’ll see the full name of the group and the number of contacts and phones on the group.

2.3. If you'd like to create a Drip campaign*, toggle the Drip campaign ON

*For more information on setting Drip campaigns, check this article.
Message:
3.1. To create an SMS campaign, select Text in the Campaign Type field

3.2. Select a message template you'd like to use for your campaign from the drop-down list. You can also search for a specific template by entering its name in the Type the name field or add a new one by clicking + Add New.

Note: The message template you select in this field is just one of the templates that will be used for your campaign. If you're sending a bigger list, once you click 'Send Campaign,' the system will prompt you to select multiple templates based on the size of the list.
3.3. Schedule your campaign*.
*Note: Campaign scheduling is only available to Pro and Elite users.
If you want to schedule your campaign to go out at a specific time or date, select Yes from the drop-down and select the date/time you want to start the campaign. Otherwise, select ‘No’ to send the campaign immediately.

3.4. Send all messages at once.*
*Note: Campaign throttling is only available to Pro and Elite users.
If you want to send the campaign in batches, select No, then select the number of phones per batch you want to send and the interval you need it to run in between (i.e. every X minutes, hours, days).

NOTE: Due to the A2P 10DLC regulation, carriers set a throughput limit on the number of SMSes each brand can send to their numbers per minute/per day. Due to this limit, the system sets a maximum # of phones per minute based on your brand limits. This number cannot be increased. You can check the limits in Settings -> A2P 10DLC
Otherwise, select Yes to send all the messages at once.
3.5. Run campaign for a set period.*
* Note: Only available to Pro and Elite users when you select to send leads in batches.
If you set your campaign to send messages in batches, you can also set a period the campaign will be sending SMSes and the days of the week you’d like it to run on. To set this, select Yes, then select the timeframe and the days of the week you’d like the campaign to run on.

Otherwise, select No, and the campaign will be sending SMSes in batches as per the max throughput between 9 AM and 8 PM, according to the timezone specified in your profile.
Rules for Messages
You can manage your contacts efficiently by setting Rules for your campaign by toggling Rules for Messages ON

4.1. You can set the trigger for the Rule by selecting a pool of contacts from the drop-down list in the Execute Rule When field:

Once you select the trigger, you can select an action that will apply to all contacts of the selected pool
4.2. You can add the contacts selected to another group. Click on the N/A field to select an existing group from the drop-down list or +Add New Group to create a new group.

Once selected, the system will automatically filter the contacts selected in the Execute Rule When field to the selected group.
4.3. You can set the system to add a label to the selected pool of contacts automatically. Click on the N/A field to select an existing label from the drop-down list or +Add/Edit Label to create/edit a label.

Once selected, the system will automatically add the selected label to the contacts selected in the Execute Rule When field.
Click on the ‘Next’ button.
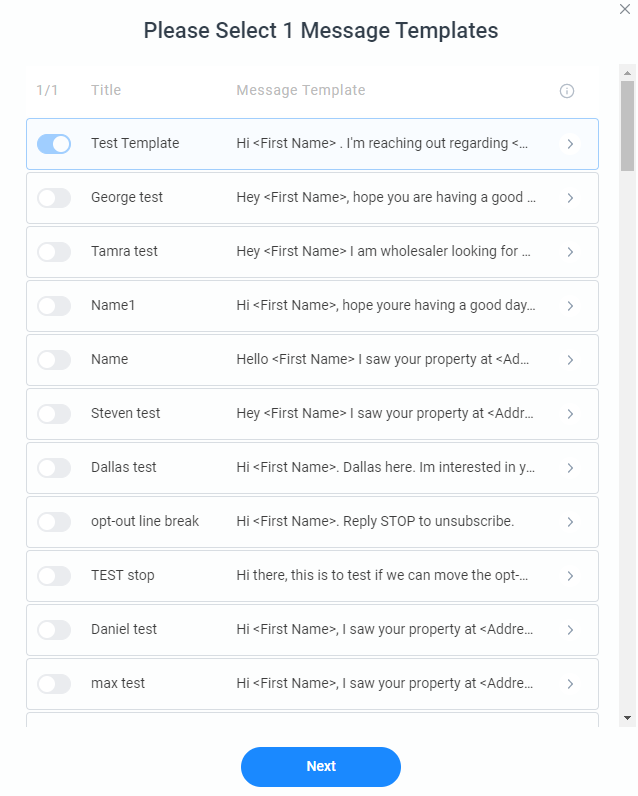
5.1. Select the required number of templates to use in the campaign by toggling them on from the list of saved templates and hit Next
5.2. A confirmation message will appear to show you the details and cost of the campaign. Hit Confirm

The cost of the campaign will be charged from your account balance once the campaign is Active.
5.3. A notification box with the name of the contact, address, and a preview of the message will pop up on the screen. You’ll be prompted to click on Send for each message that will be sent in the campaign all the way until the last contact in the list. Then you'll receive a confirmation screen to let you know the campaign has been created. You need to click Confirm, and the campaign status will turn to Active.

NOTE: When you click Send for each of your message templates, you simply confirm sending these messages within a campaign. Clicking Send does not send this message right away, you need to click through to the very end of your templates and confirm sending the campaign.
This is our click-through feature that ensures there is a human interaction behind each SMS sent, making the software fully TCPA Compliant.
Only when you click Confirm, and the campaign status turns to ‘Active’, the system starts sending SMS.

IMPORTANT:
Basic plan users have campaign limitations in 500 SMS/billing cycle.
Starter plan users have campaign limitations in 2 500 SMS/billing cycle.
*SMS that are sent via Messenger are not included into this limit.