---
title: Creating Effective Drip Campaigns
description: Build automated SMS follow-up sequences that stop the moment a lead replies. Discover best practices for deliverability, TCPA compliance, and using voicemail drops to maximize your response rates.
---
[](https://smartercontact.com/)
☰
Solutions
- [Real Estate Investing](https://smartercontact.com/real-estate-investing/)
- [Real Estate Agent](https://smartercontact.com/real-estate-agent/)
- [General Sales/Marketing](https://smartercontact.com/general-sales-marketing/)
- [Automotive](https://smartercontact.com/automotive/)
- [Event Promotion](https://smartercontact.com/event-promotion/)
- [Gym/Fitness](https://smartercontact.com/gym-fitness/)
- [Staffing](https://smartercontact.com/staffing/)
Features
- [Texting Automation](https://smartercontact.com/sms-automation/)
- [Calling](https://smartercontact.com/calling/)
- [Reporting](https://smartercontact.com/reporting/)
- [Built-in CRM](https://smartercontact.com/built-in-crm/)
- [Custom Campaigns](https://smartercontact.com/custom-campaigns/)
- [Calendar](https://smartercontact.com/calendar/)
- [Integrations](https://smartercontact.com/integrations/)
[Pricing](https://smartercontact.com/pricing/)
Resources
- [Launch Control vs Smarter Contact](https://smartercontact.com/launch-control-vs-smarter-contact/)
- [Smarter Contact Managed](https://smartercontact.com/managed-plans/)
- [Our Team](https://smartercontact.com/our-team/)
- [Tutorials](https://smartercontact.com/tutorials/)
- [Our Story](https://smartercontact.com/our-story/)
- [Help Center](https://support.smartercontact.com/?hsLang=en)
- [Blog](https://smartercontact.com/blog/)
[Affiliate Program](https://lp.smartercontact.com/affiliates) [Dialer](https://smartercontact.com/dialer/)
[Log in](https://app.smartercontact.com/login) [Get started now](https://app.smartercontact.com/signup)
[Skip to content](https://support.smartercontact.com/drip-campaigns#main-content)

Open main navigation
Close main navigation
- [Go to App](https://app.smartercontact.com/?utm_source=knowledge_base)
[Go to App](https://app.smartercontact.com/?utm_source=knowledge_base)
How can we help you?
- There are no suggestions because the search field is empty.
1. [Help Center](https://support.smartercontact.com/?hsLang=en)
2. [Campaigns](https://support.smartercontact.com/campaigns?hsLang=en)
August 11, 2026
# Creating Effective Drip Campaigns
## Automated Messaging That Scales
A **Drip Campaign** is a sequence of scheduled messages sent automatically to your contact lists. It provides consistent messaging and persistent follow-up until a contact responds. Because SMS boasts significantly higher response rates than email, Drip Campaigns are one of the most effective ways to scale your pipeline development.
### How Drip Campaigns Work
- **Automated Persistence:** The system follows up on your behalf at intervals you define.
- **Smart Stops:** Once a contact replies, the sequence automatically stops for them, allowing you to take over the conversation personally.
- **Capacity:** You can set up to **nine messages** per campaign with a minimum interval of **one day** between sends.
- **Availability:** Drip campaigns are available on **Pro** and **Elite** plans.
### Creating Your First Drip Campaign
Drip campaigns are built within the **Campaigns** page. Any "Standard" campaign becomes a drip campaign the moment you add more than one message.
#### 1. Initial Setup
- Go to **Campaigns** and click **New Campaign** → **Standard Campaign**.
- Enter a name for your campaign and select your **Contact Group**.
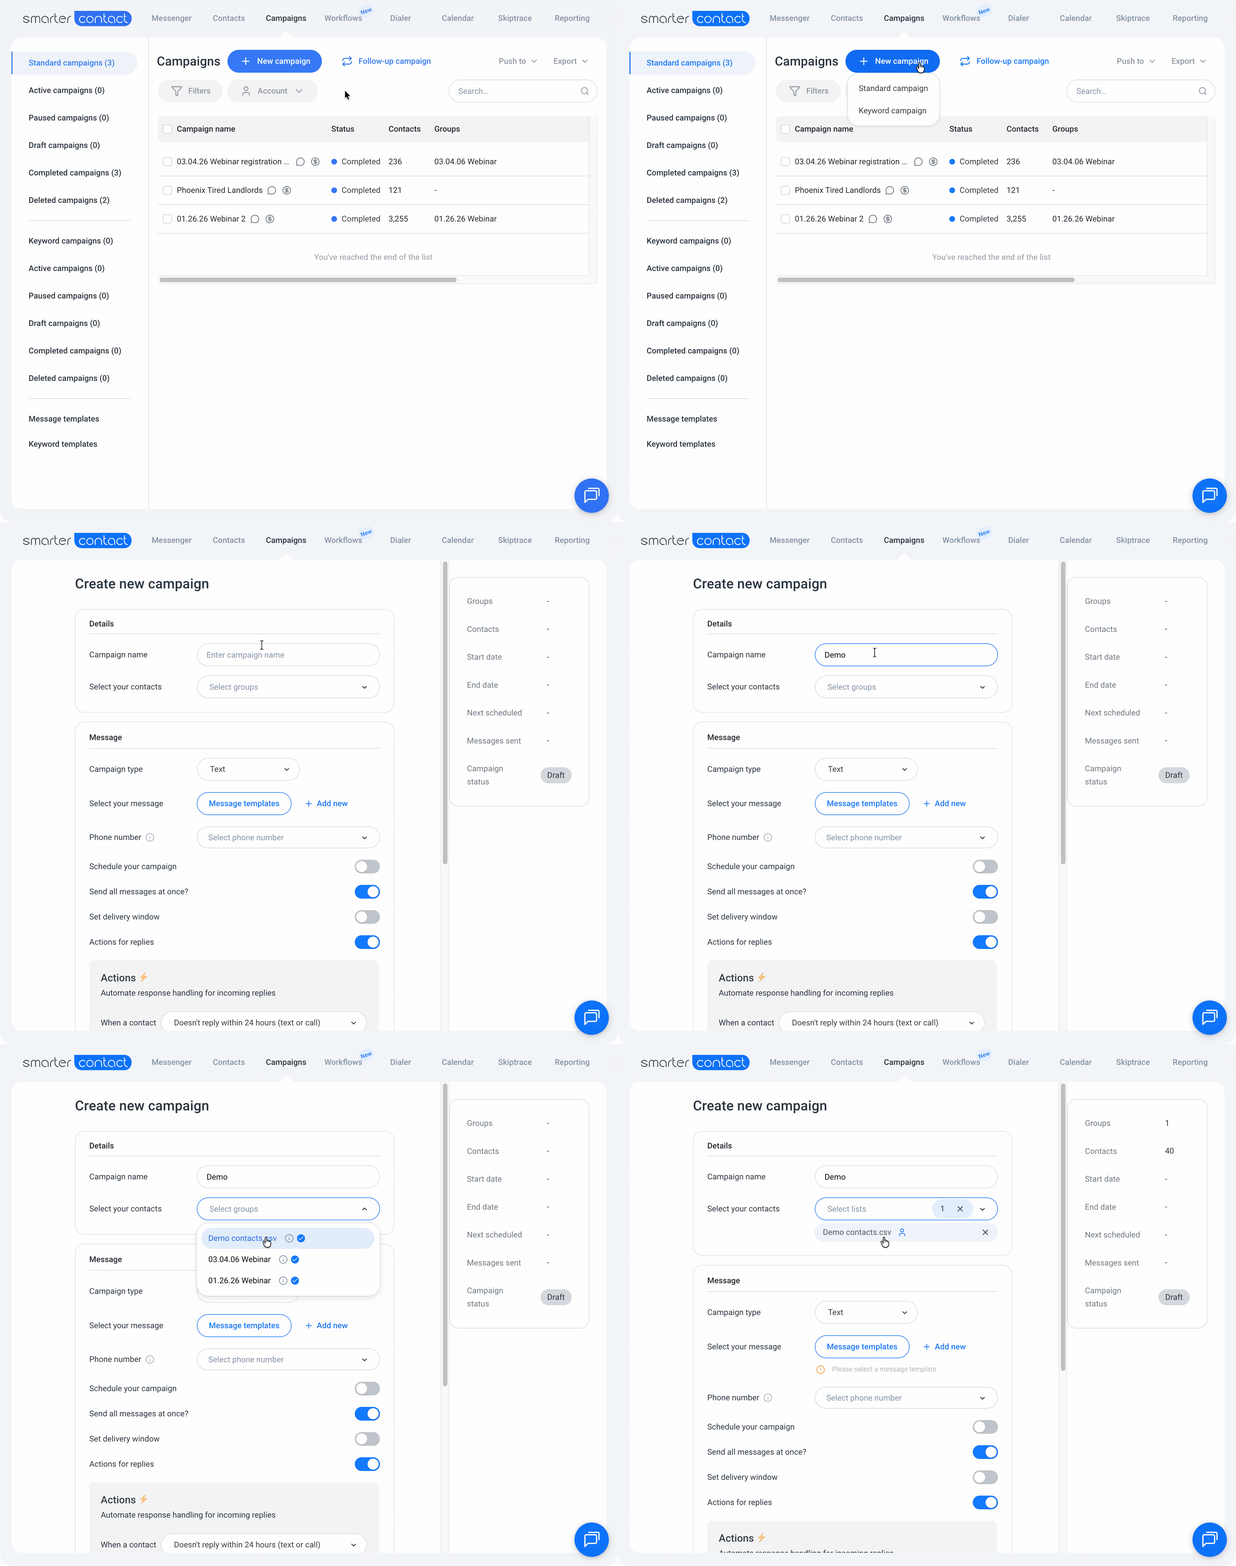
You can select up to 10 groups per campaign. If a contact appears in multiple groups, the system automatically identifies the duplicate and treats it as a single entry.
#### 2. Configure Message #1
- **Message Type:** Choose **Text** for SMS or **Voicemail Drop** for a pre-recorded message.
- **Using Templates:** Click **Message Templates** to choose a saved one, or **+ Add New** to create one.
- **Drip Logic:** For your first message, select **Text (Initial)**. For all subsequent messages, use **Text (Follow-up)**.
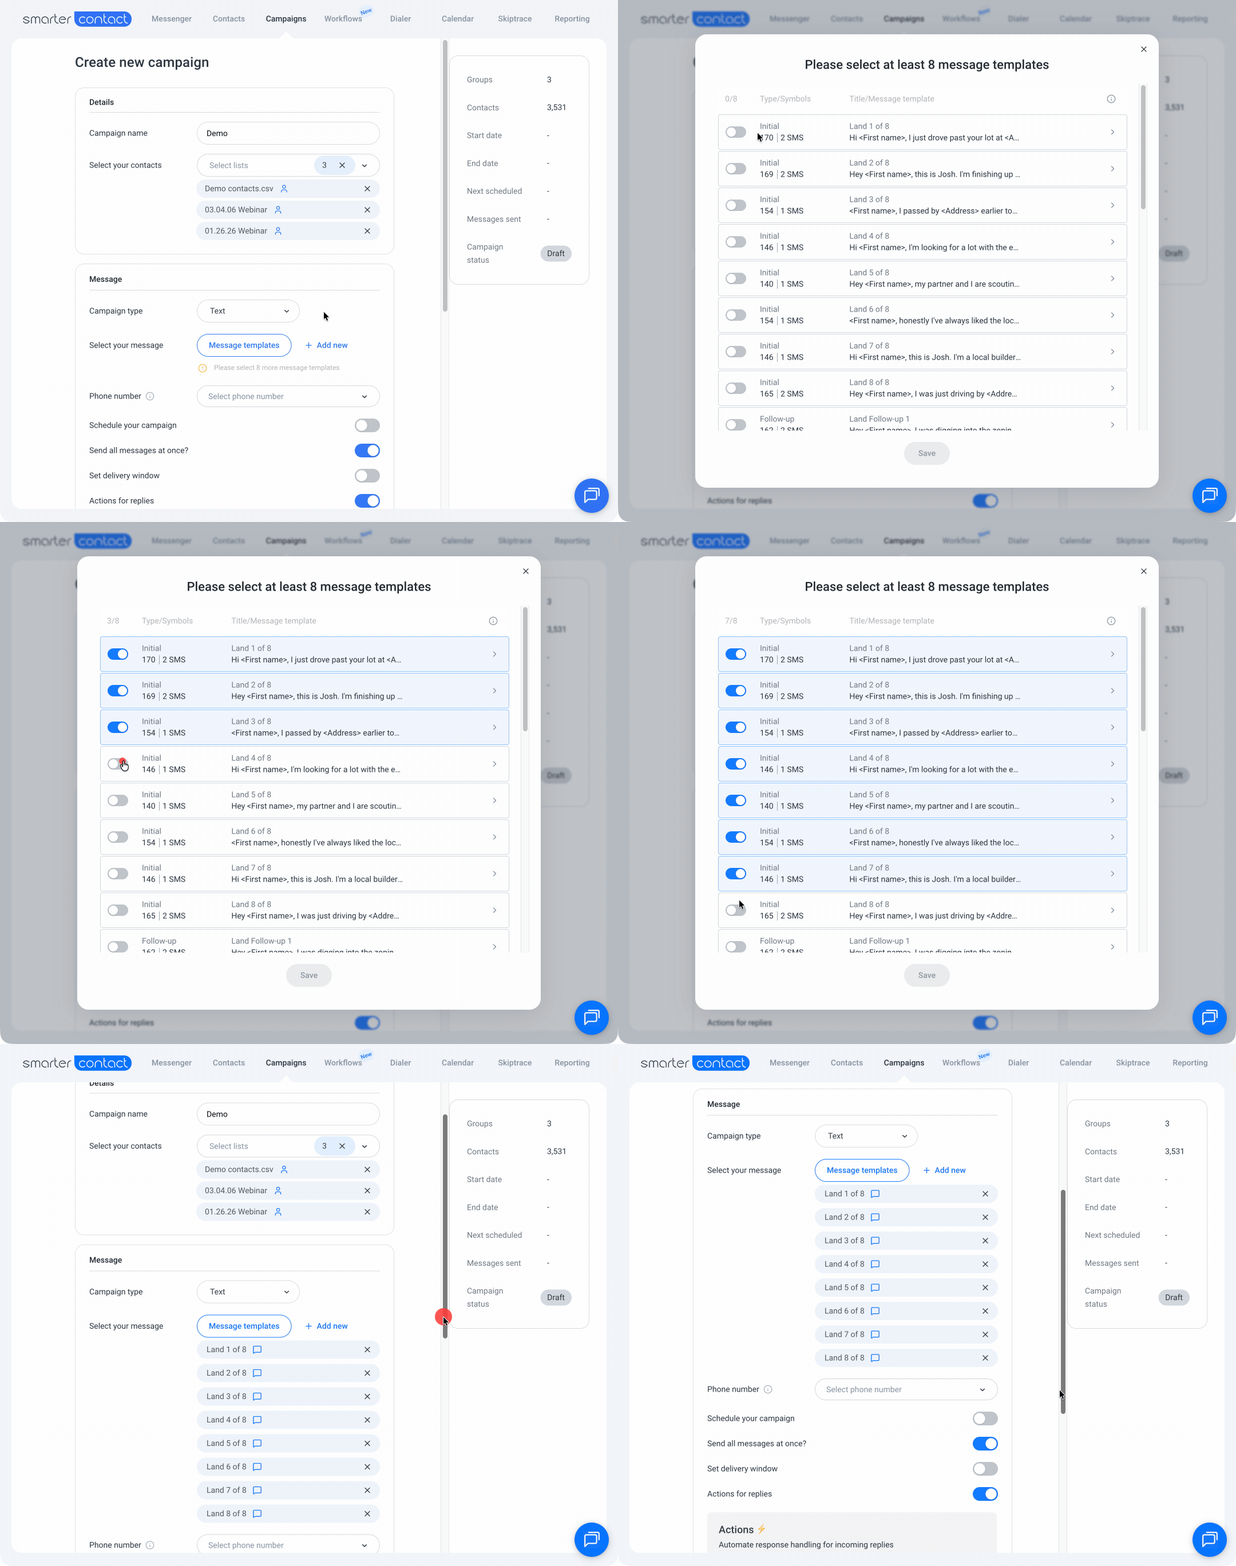
The system automatically calculates the minimum number of templates required based on your total contact volume. This requirement caps at eight templates, therefore, we recommend always creating at least eight unique variations for your initial message to ensure optimal deliverability and carrier compliance.
To protect your sending reputation, aim for at least one unique template per 1,000 contacts. If you’re stuck on the writing, let our AI Template Assistant do the heavy lifting. It generates high-quality scripts while simultaneously checking for delivery risks to ensure your messages hit the inbox.
#### 3. Adding Voicemail Drops
Voicemail drops act as a bridge between SMS and live calls. They provide a personal touch without interrupting the lead's day.
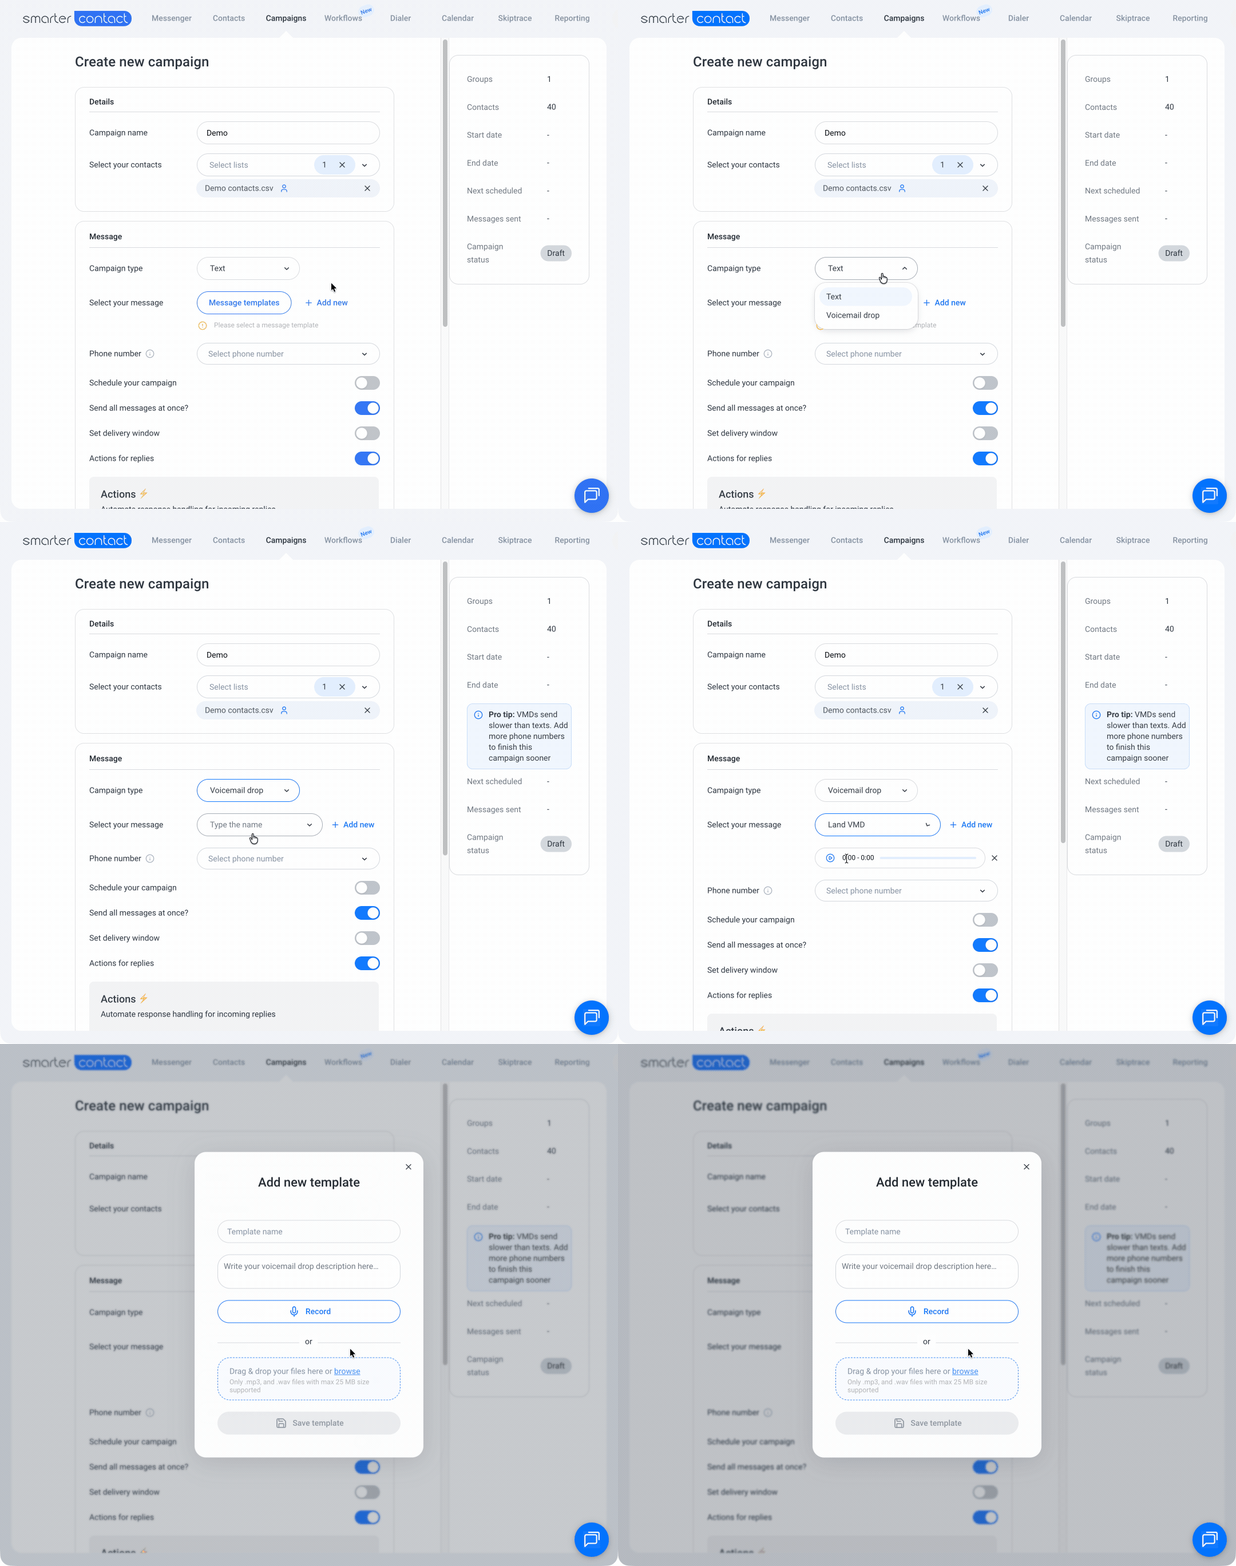
- **Best Use:** Retargeting leads who didn't reply to your initial text. This creates a "warm call" effect, significantly increasing future callback rates.
- **Setup:** Record audio directly in the app or upload a file (**.mp3** or **.wav**, max 25MB).
Voicemail drops typically have longer delivery times than SMS. To optimize campaign performance, we recommend placing voicemails as the final step in your sequence. To increase your overall delivery speed, consider adding more phone numbers to your campaign pool to improve throughput.
#### 4. Campaign Settings
- **Phone Numbers:** Select the numbers you want the system to rotate through.
For campaigns with fewer than 2,500 records, a minimum of one phone number is required. For lists of 2,500 records or more, you must have at least three lines to launch. As a general rule of thumb, we recommend adding one phone number for every 1,000 contacts to ensure the best deliverability results.
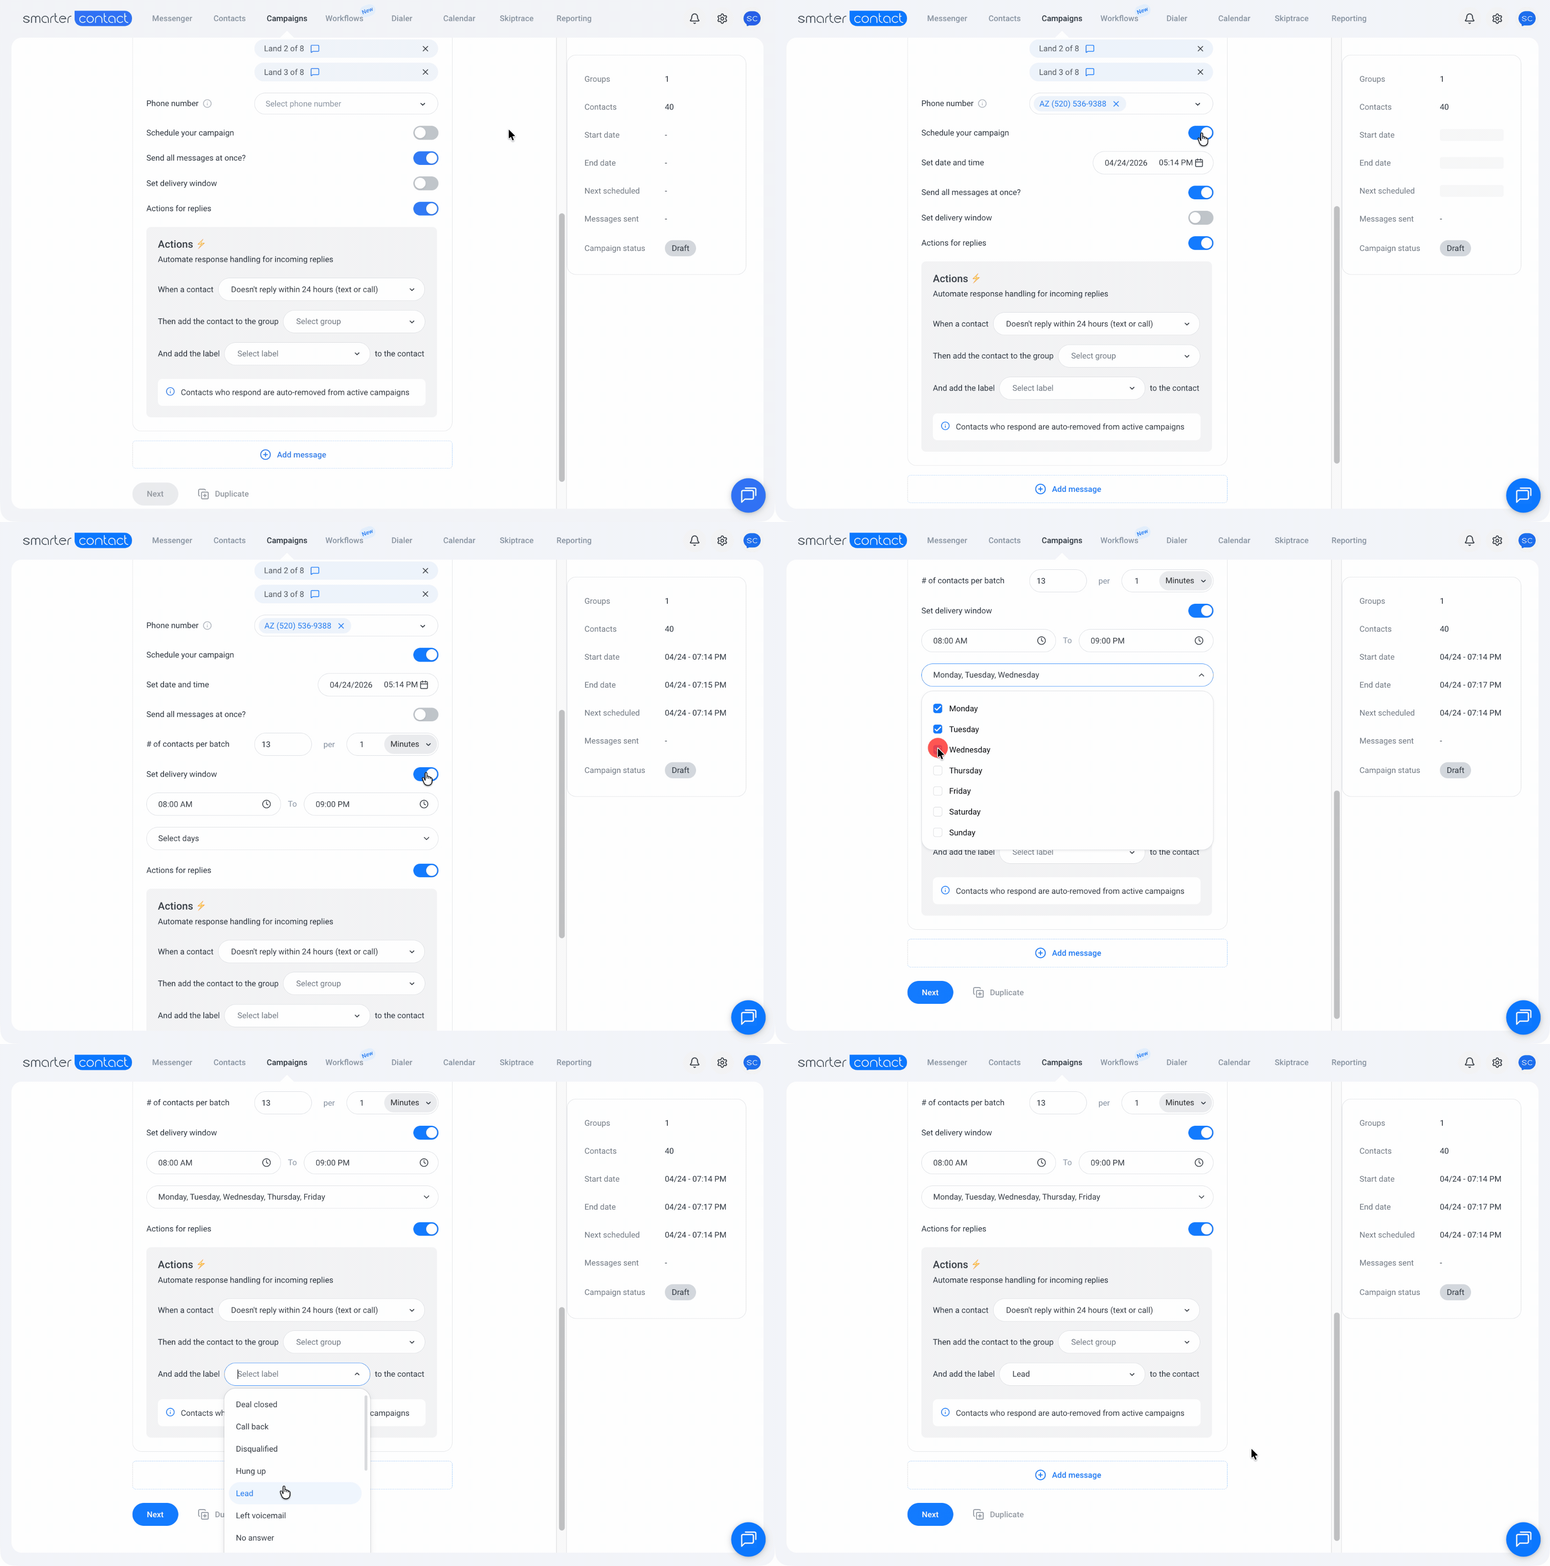
- **Schedule:** Toggle this **ON** to start the campaign at a specific date and time.
- **Sending Speed:** When enabled, your campaign will run at the maximum throughput permitted by your account. Toggle '**Send all messages at once**' OFF if you prefer to throttle the delivery speed or customize your messaging schedule by specific hours and days.
- **Delivery Window:** Define the permitted days and hours for your message delivery. If your sequence includes multiple messages, use this tool to precisely control the delivery windows for your follow-ups.
- **Actions for Replies:** Streamline your lead management by automatically assigning **Labels** or moving contacts to a specific **Group** the moment they respond. You can also trigger these actions for contacts who don't reply within 24 hours of delivery.
#### 5. Adding the "Drip" (Messages 2–9)
Here you'll add your follow-up messages and set the timing between them.
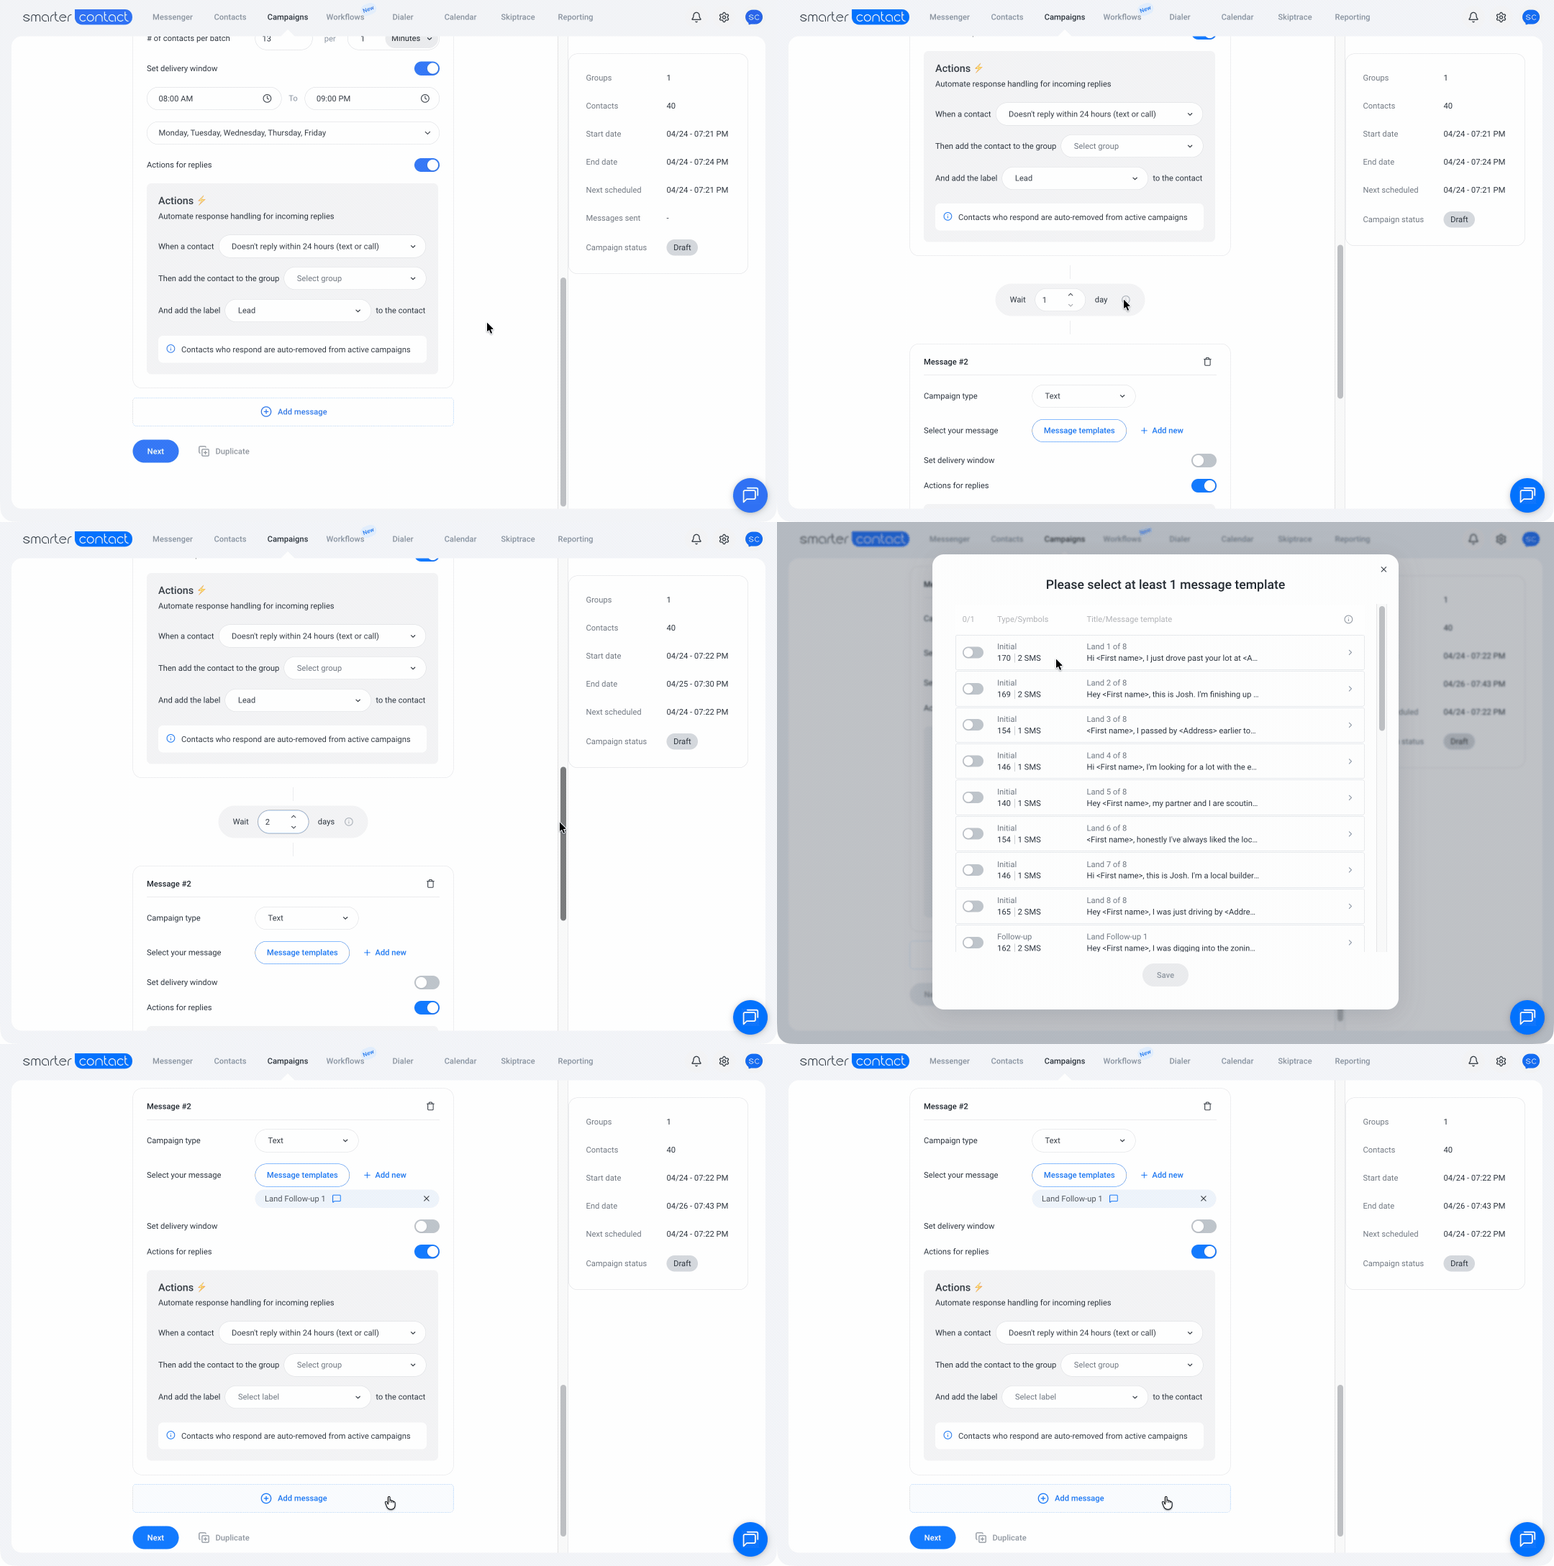
**Waiting time**
Set the interval before each follow-up. The field defaults to **1 day**, and you can schedule any interval up to **365 days (one year)** for long-term sequences. To keep your messaging from looking robotic, the system automatically adjusts 24-hour gaps by about 30 minutes while maintaining the highest possible delivery rates.
**Minimum wait times**
Drip campaigns enforce a **minimum wait between messages that increases as the sequence goes on**. This lets you follow up quickly at first — up to three messages in the first week — then gradually slow down to protect your deliverability and stay within carrier expectations. The minimum depends on each message's position:
| Message Position | Earliest Send Day (cumulative) |
| --- | --- |
| Message #1 (initial) | Day 0 |
| Message #2 | Day 1 |
| Message #3 | Day 3 |
| Message #4 | Day 10 |
| Message #5 | Day 17 |
| Message #6 | Day 24 |
| Message #7 | Day 54 |
| Message #8 | Day 84 |
| Message #9 | Day 114 |
A few things to know:
- **Automatic adjustment:** If you set a wait time below the minimum for a position, the system quietly raises it to the allowed minimum when you move on or save — no error or warning appears.
- **Longer is always fine:** You can set any interval above the minimum, up to the 365-day maximum.
- **Where it applies:** These minimums apply to new drip campaigns only — existing drips keep their original timing. Follow-up campaigns (the 1-day gap logic) and Contact Workflows aren't affected.
- **Need a tighter cadence?** Launch additional follow-up campaigns against the same contacts; they aren't bound by these position-based minimums. Those messages still count toward the per-contact cap (**3 texts per 7 days, with a 14-day cooldown**).
**Mix & Match**
You can alternate between SMS and Voicemail drops to keep your messaging varied and natural.
**Templates**
While only one template is required for each follow-up, we recommend adding multiple variations to diversify your messaging and improve engagement.
#### 6. Clickthrough & Compliance
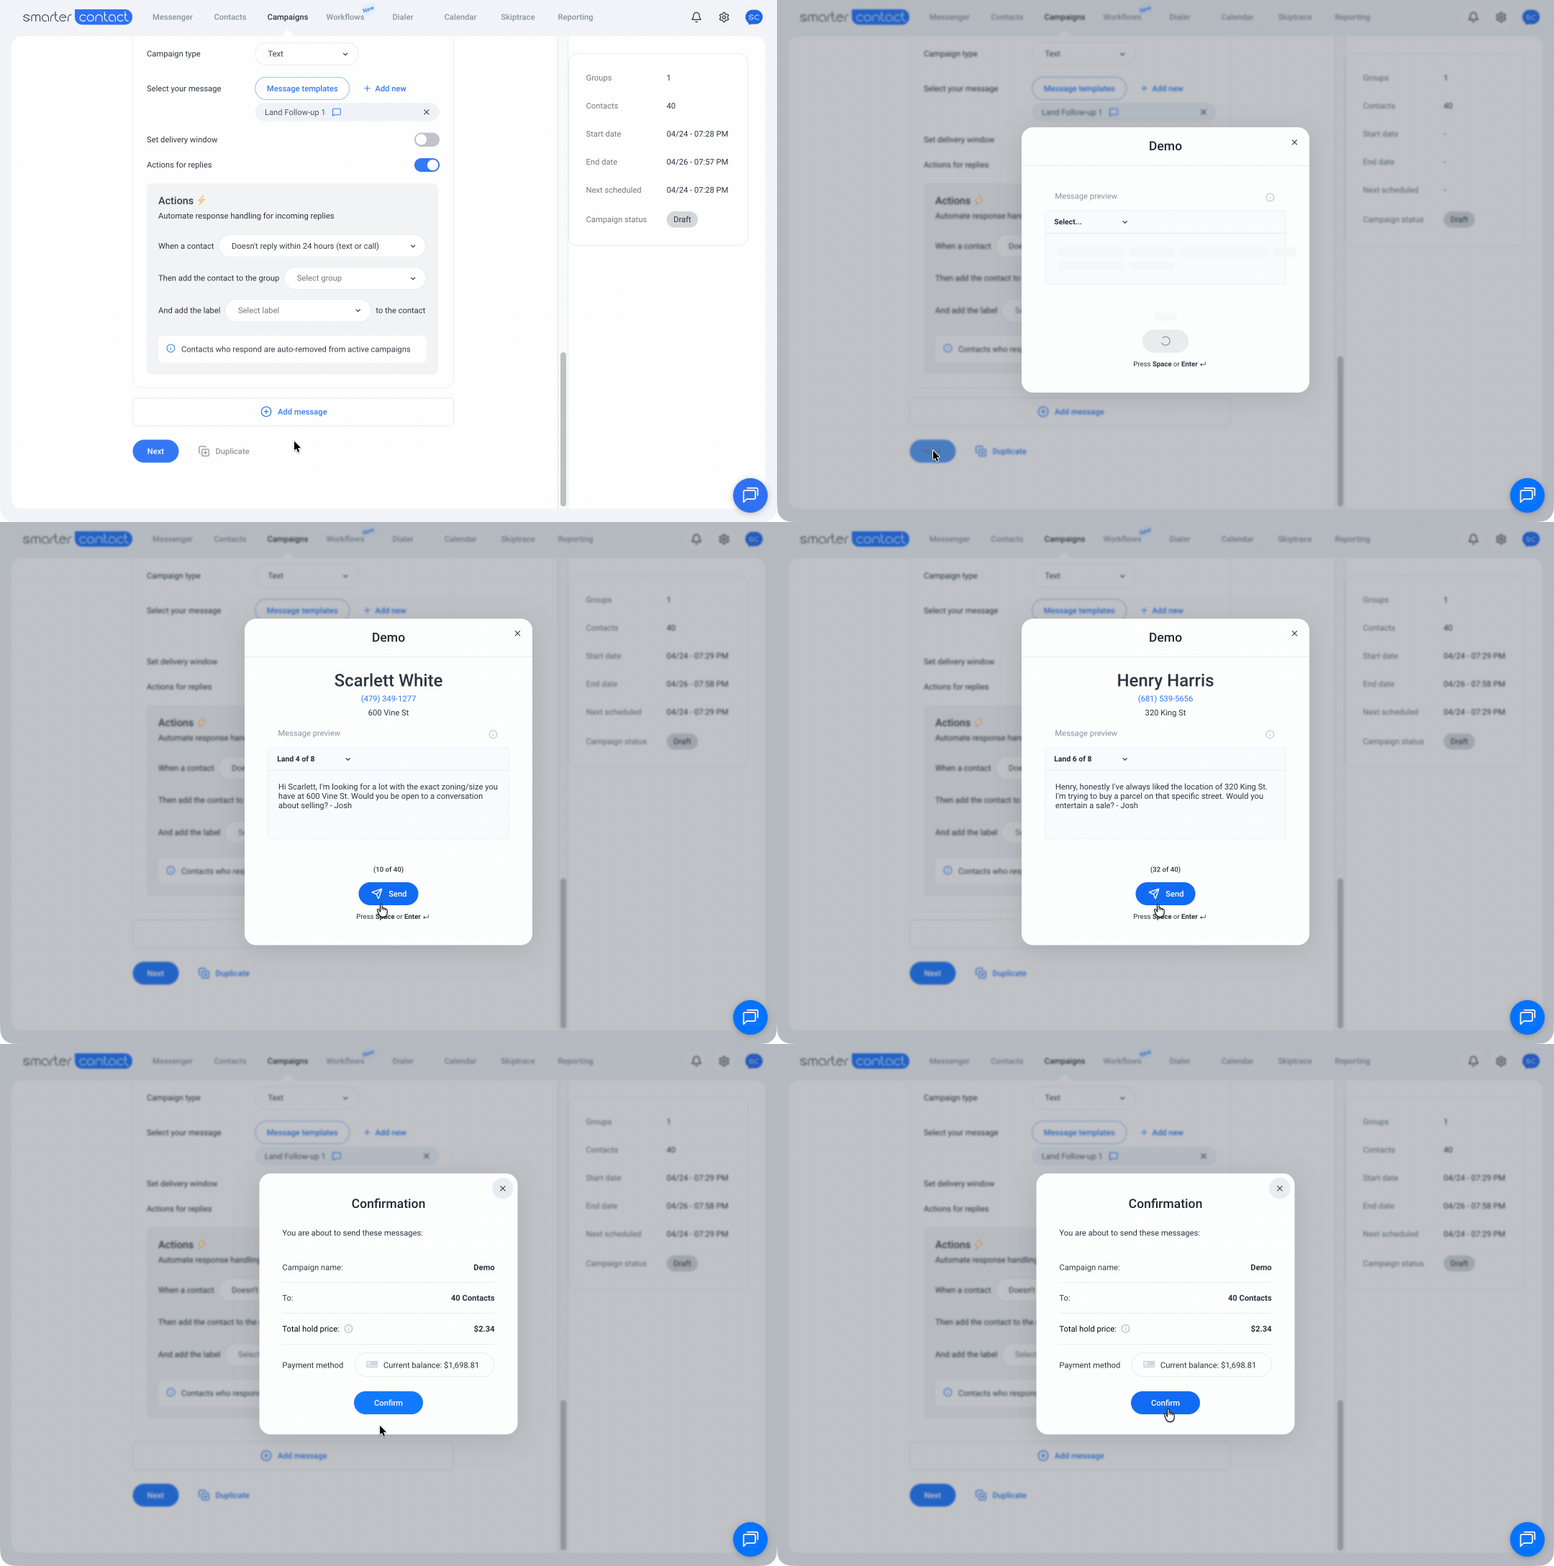
After clicking Next, a message preview will appear for each contact. You must review the preview and click **Send** (or press Space/Enter).
This is a vital TCPA compliance feature. By requiring a human interaction to initiate the messages, the system ensures your messaging remains compliant while still being incredibly fast. The campaign only becomes Active once you have confirmed the previews.
Once you have reviewed the previews, the system will display the total cost for the campaign. If you are on a **Committed Usage** plan, the messages will be deducted from your plan balance. Simply confirm the launch to activate your campaign.
##### With 💙,
##### The Smarter Contact Team
- [Contact Us](https://smartercontact.com/contact-us/)
[](http://smartercontact.com)
###### ###### [Product](https://smartercontact.com/pricing/)
[Messaging Plans](https://smartercontact.com/messaging-plan/)
[Calling Plans](https://smartercontact.com/calling-plan/)
[Mobile App](https://smartercontact.com/mobile/)
[What’s New](https://smartercontact.com/whats-new/)
[Pricing](https://smartercontact.com/pricing/)
###### Company
[Privacy Policy](https://smartercontact.com/privacy-policy/)
[Terms & Conditions](https://smartercontact.com/terms-and-conditions/)
[mailto:support@smartercontact.com](mailto:support@smartercontact.com)
Copyright © 2026, Smarter Contact
#### Product
- [Messaging Plans](https://smartercontact.com/messaging-plan/)
- [Calling Plans](https://smartercontact.com/calling-plan/)
- [Mobile App](https://smartercontact.com/mobile/)
- [What’s New](https://smartercontact.com/whats-new/)
- [Pricing](https://smartercontact.com/pricing/)
#### Company
- [Privacy Policy](https://smartercontact.com/privacy-policy/)
- [Terms & Conditions](https://smartercontact.com/terms-and-conditions/)
#### Solutions
- [Investors](https://smartercontact.com/real-estate-investors/)
- [Agents](https://smartercontact.com/real-estate-agents/)
- [Brokers](https://smartercontact.com/real-estate-brokers/)
- [Wholesalers](https://smartercontact.com/real-estate-wholesalers/)
- [Land Flippers](https://smartercontact.com/real-estate-land-flippers/)
- [Fix and Flippers](https://smartercontact.com/real-estate-fix-and-flippers/)
- [Land Developers](https://smartercontact.com/real-estate-land-developers/)
- [Property Developers](https://smartercontact.com/real-estate-property-developers/)
#### Comparison
- [Launch Control vs Smarter Contact](https://smartercontact.com/launch-control-vs-smarter-contact/)
- [Batch Leads vs Smarter Contact](https://smartercontact.com/batch-leads-vs-smarter-contact/)
- [Lead Sherpa vs Smarter Contact](https://smartercontact.com/lead-sherpa-vs-smarter-contact/)
- [ReplySmart vs Smarter Contact](https://smartercontact.com/replysmart-vs-smarter-contact/)
- [ZeitBlast vs Smarter Contact](https://smartercontact.com/zeitblast-vs-smarter-contact/)
- [Sendivo vs Smarter Contact](https://smartercontact.com/sendivo-vs-smarter-contact/)
- [HighLevel vs Smarter Contact](https://smartercontact.com/highlevel-vs-smarter-contact/)
- [XLeads vs Smarter Contact](https://smartercontact.com/xleads-vs-smarter-contact/)
- [ReadyMode vs Smarter Contact](https://smartercontact.com/readymode-vs-smarter-contact/)
- [BatchDialer vs Smarter Contact](https://smartercontact.com/batchdialer-vs-smarter-contact/)
- [PhoneBurner vs Smarter Contact](https://smartercontact.com/phoneburner-vs-smarter-contact/)
- [Roor vs Smarter Contact](https://smartercontact.com/roor-vs-smarter-contact/)
#### Resources
- [Tutorials](https://smartercontact.com/tutorials/)
- [Help Center](https://support.smartercontact.com/?hsLang=en)
- [Careers](https://smartercontact.hurma.work/public-vacancies)
[](https://smartercontact.com)
[](https://apps.apple.com/us/app/smarter-contact/id1637673379) [](https://play.google.com/store/apps/details?id=com.smartercontactapp&pli=1)
© 2026 Copyright Smarter Contact.
All Rights Reserved.
```json
{
"@context" : "https://schema.org",
"@type" : "VideoObject",
"caption" : {
"@type" : "MediaObject",
"contentUrl" : "https://support.smartercontact.com/media-transcripts/219203772804/en.vtt",
"inLanguage" : "en",
"name" : "en Captions"
},
"contentUrl" : "https://21860142.fs1.hubspotusercontent-na1.net/hubfs/21860142/video_assets/219203772804/inherited/web_optimized.mp4",
"dateModified" : "2026-08-11T17:28:23.922Z",
"duration" : "PT3M7S",
"height" : 1080,
"name" : "Creative effective drip campaigns",
"thumbnailUrl" : "https://support.smartercontact.com/hubfs/Creative%20effective%20drip%20campaigns.mp4/medium.jpg",
"uploadDate" : "2026-08-11T17:28:00.158Z",
"width" : 1920
}
```