

Buying Smarter Contact takes about ten minutes from a blank browser tab to an active subscription. This guide walks you through the whole path: creating your free account, comparing plans, adding your billing details, and confirming your purchase.
You do not pay anything to create an account. Payment happens at the final step, once you have picked the plan that fits how you work.
Before You Start
Have these ready so you do not have to stop halfway through:
|
A US phone number |
Required to complete sign-up. Every account is tied to the business owner's phone so we can call, text, or send voicemails directly to the decision-maker. |
|
A payment card |
Added during checkout. You are not charged until your trial ends or until you confirm the charge directly. |
ⓘ Note: If a virtual assistant or account manager is setting up the account for a client, use the business owner's US phone number at sign-up.
Step 1: Create Your Free Account
Head to the sign-up page and register using your email address, Google account.
Whichever route you choose, the flow is the same:
- Enter your credentials, or authenticate with Google.
- Verify your US phone number with the 6-digit code sent by SMS.
- Confirm your email address using the link we send you.
- Answer the four onboarding questions covering your industry, role, company size, and timezone.
- Click Done to enter the product.@
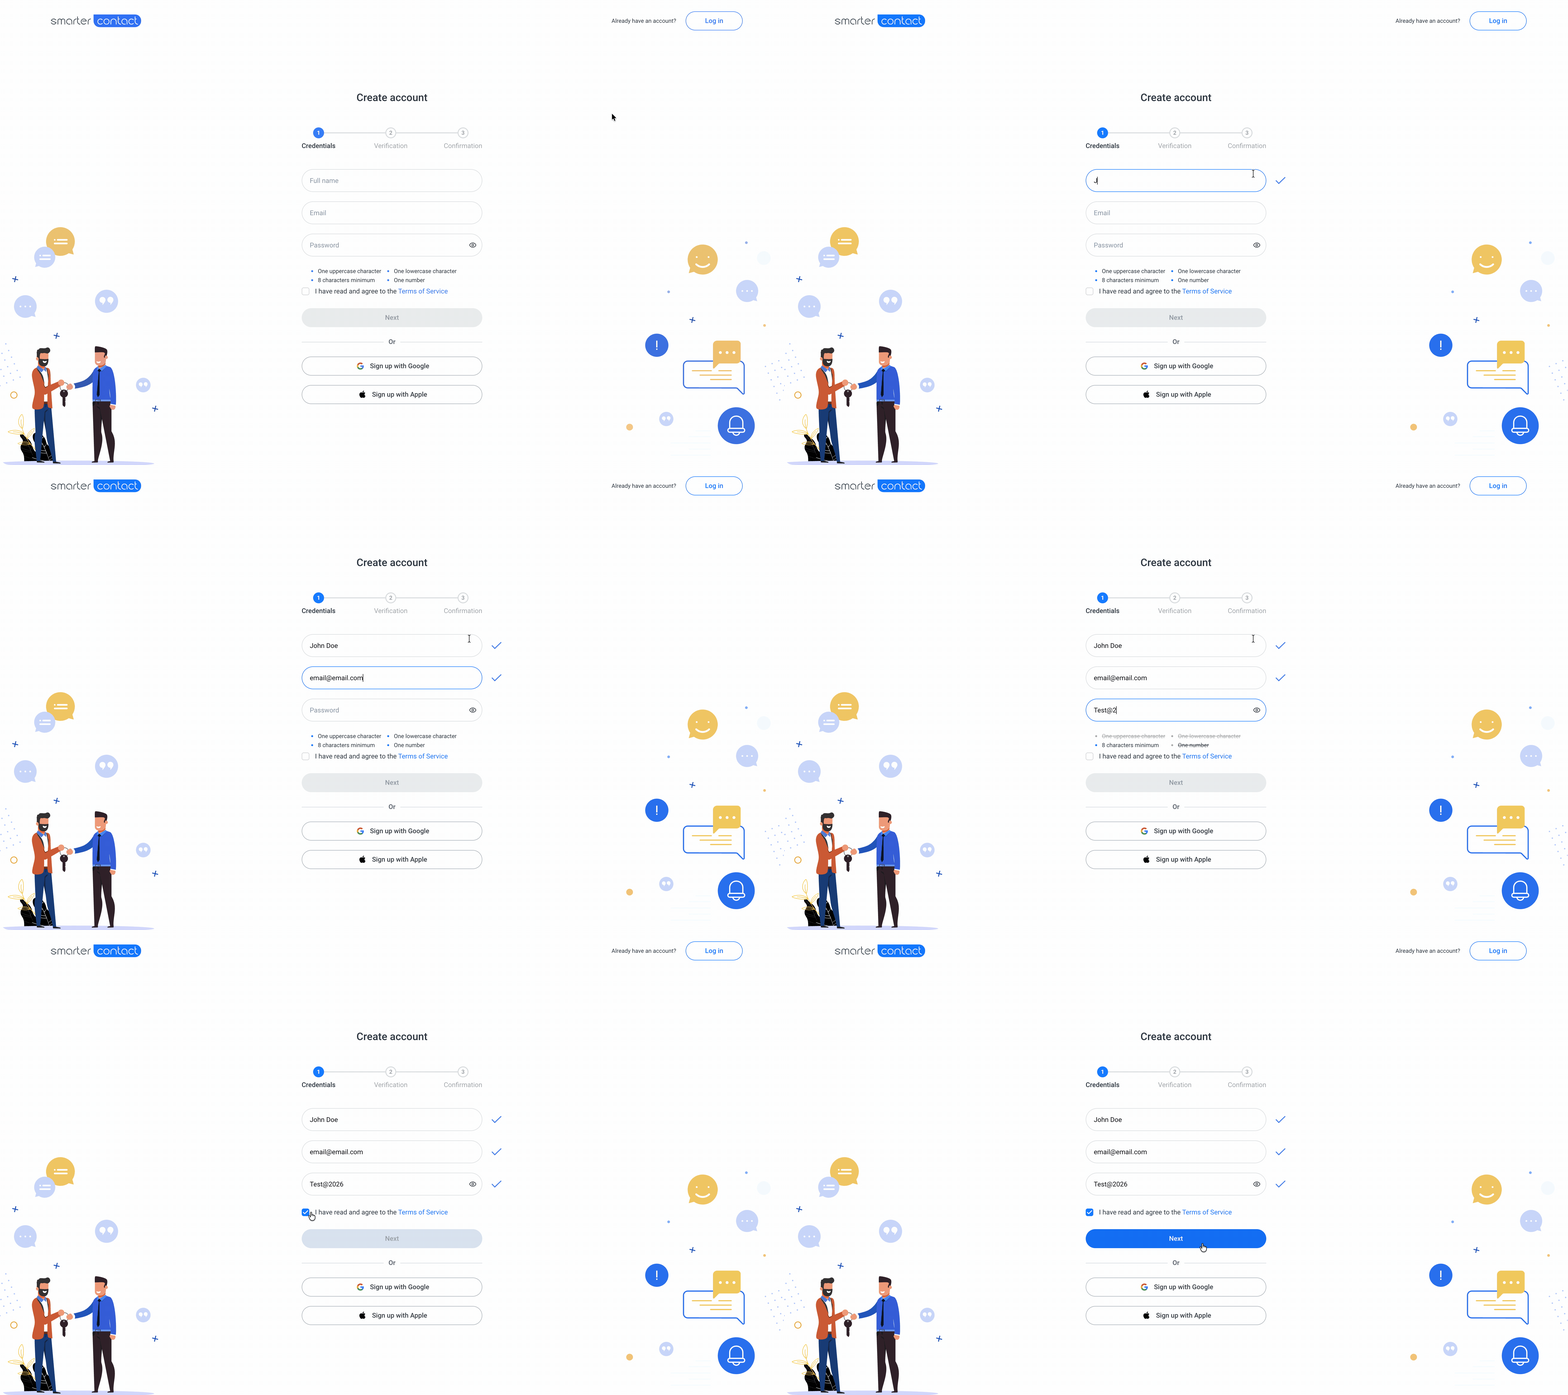
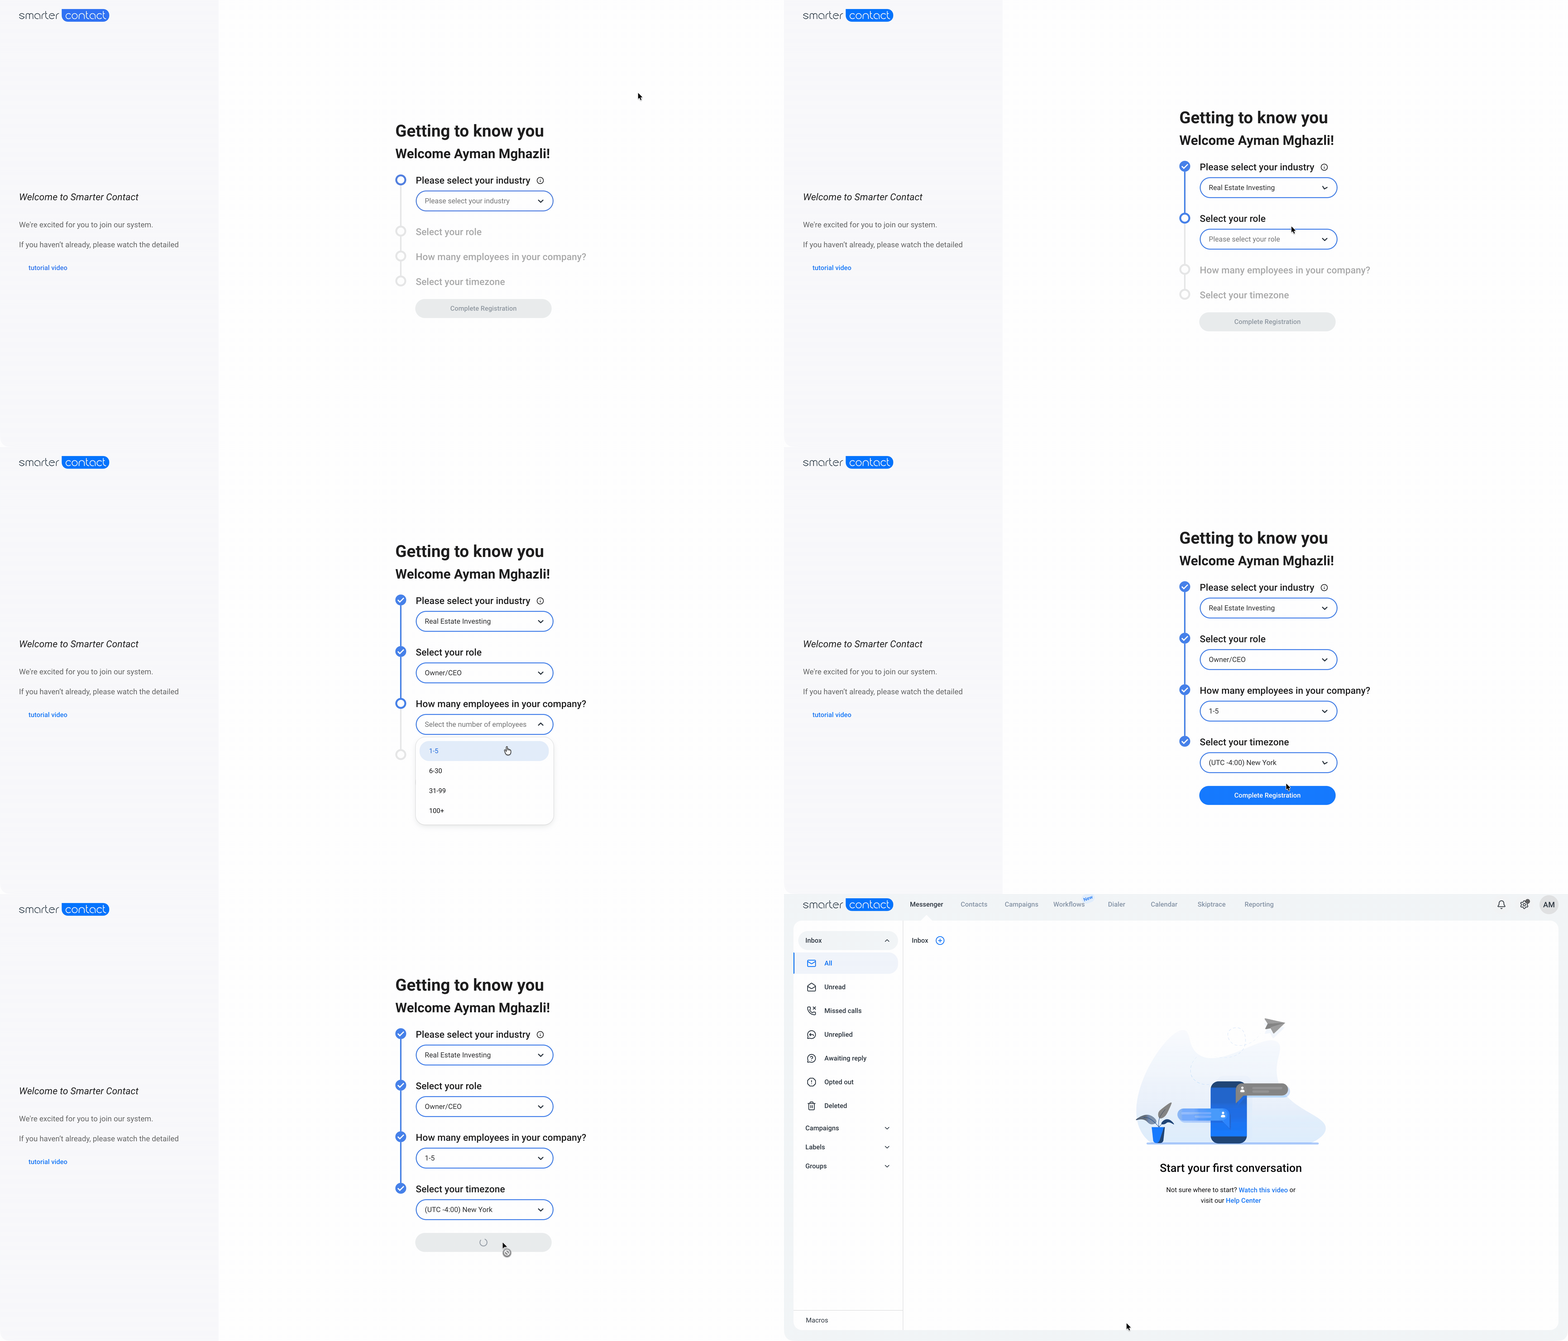
For the full walkthrough, including field requirements and how to set a password on a Google account, see Creating an Account with Smarter Contact for Free.
💡 Pro tip: Signing up with Google skips the password step entirely and gets you into the product faster.
Step 2: Choose Your Plan
Smarter Contact offers two plan families. You can subscribe to either one, or run both side by side.
Messaging Plans cover text campaigns, two-way messaging, voice messaging, and voicemail drops, with the AI bundle and mobile app included at every tier.
Calling Plans cover the cloud-based power dialer, with predictive and preview dialing, line swapping, call scripts, and phone health scoring.
Both families use the same three tiers:
|
Plan |
Best for |
Messaging Plan |
Calling Plan |
|
Starter |
Solo operators running their first campaigns |
$199/mo billed quarterly |
$199/mo billed quarterly |
|
Pro |
Teams adding drip campaigns, scheduling, and throttling |
$399/mo billed quarterly |
$399/mo billed quarterly |
|
Elite |
Teams that need workflows, integrations, and 3 seats |
$499/mo billed quarterly |
$499/mo billed quarterly |
Committed use tiers are also available on Messaging Plans. Elite Plus 20k, 50k, 75k, and 100k bundle a fixed volume of texts each period at a lower per-text rate, and include VIP Plus support and dedicated onboarding.
For the full feature-by-feature comparison and current rates across every billing term, see the Pricing page.
💡 Pro tip: Switching from quarterly to yearly billing lowers your effective monthly cost on every tier. The longer the term you commit to, the more you save.
Step 3: Add Your Billing Details
Once you are inside the product:
- Click the Settings wheel and go to the Membership page.
- Scroll down to the Payment section.
- Click Manage cards.
- Add your card details and save.
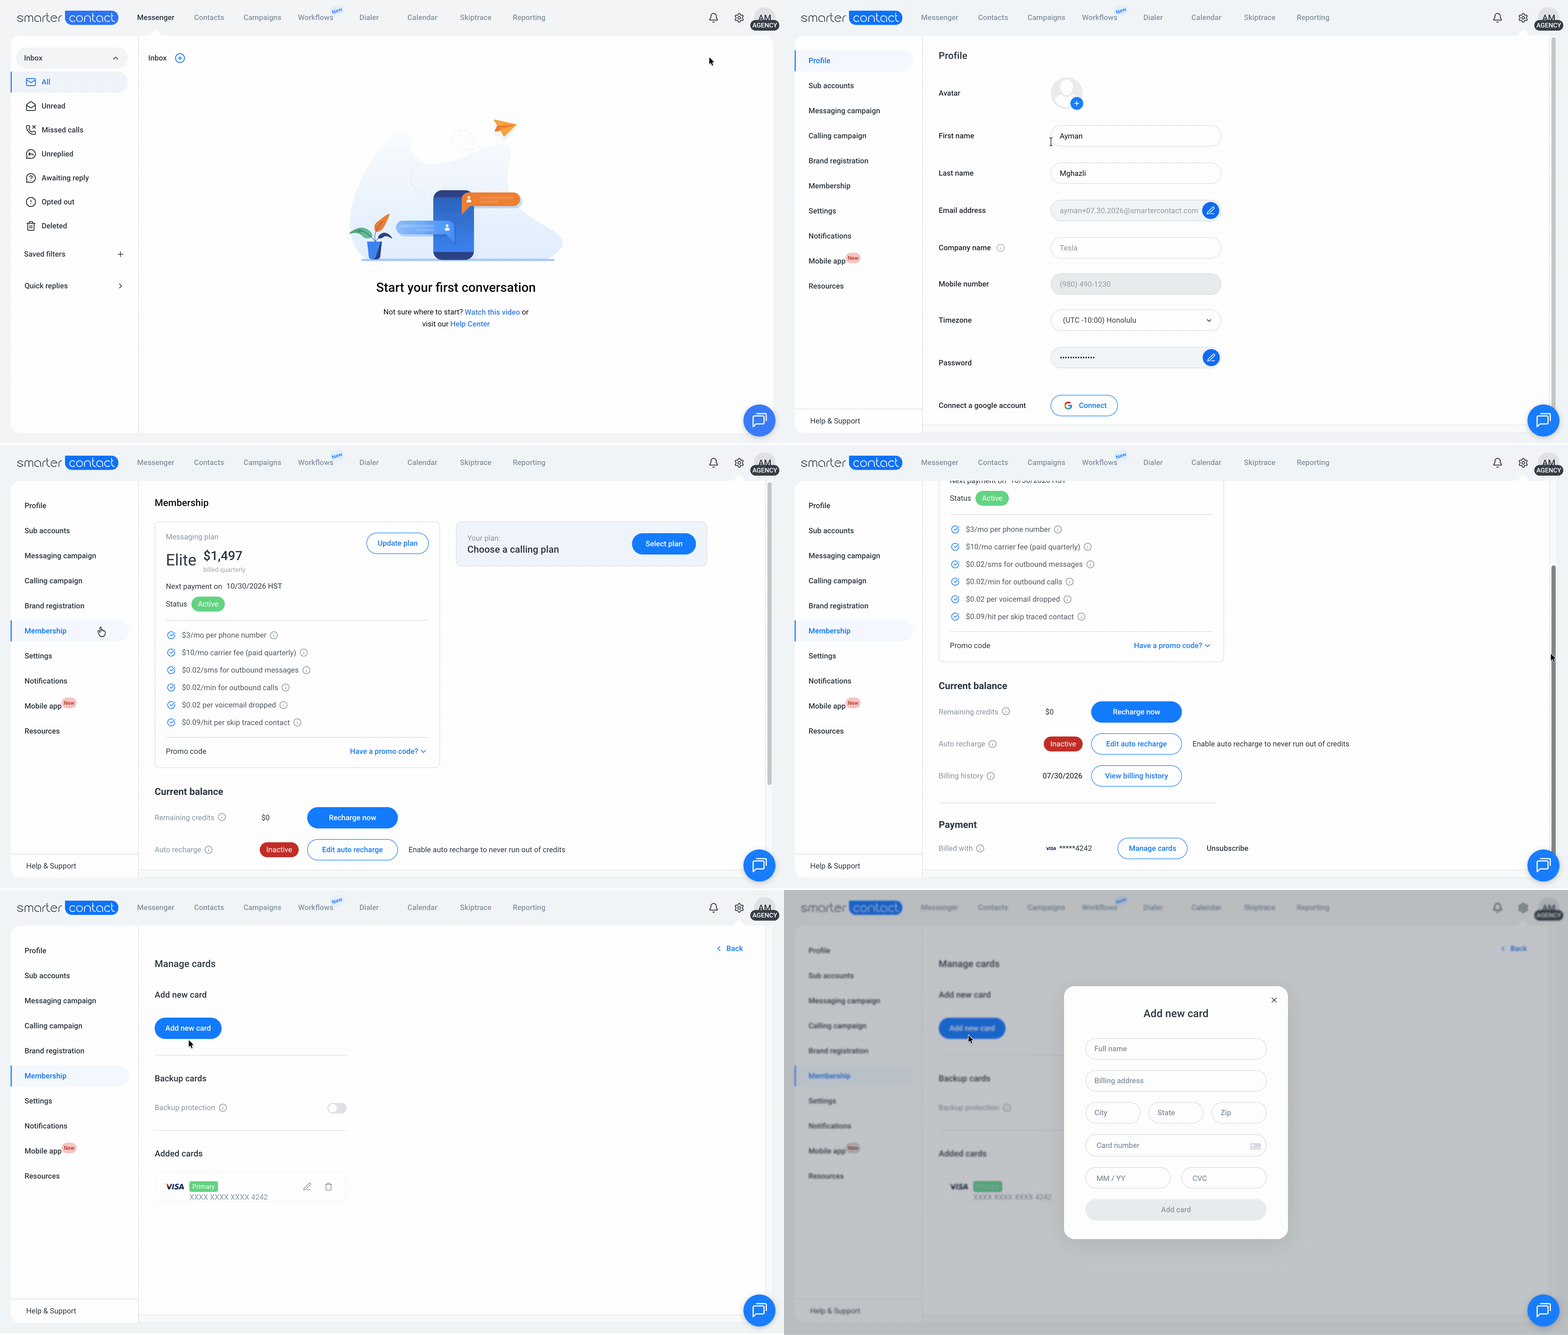
Your card is stored securely and is not charged at this point.
Step 4: Select Your Plan
Still on the Membership page:
- Click Update Plan.
- Choose either a Messaging Plan or a Calling Plan.
- Select the tier you want.
- To switch from quarterly to yearly billing, toggle the Yearly menu.
- Click Update Plan again to confirm.
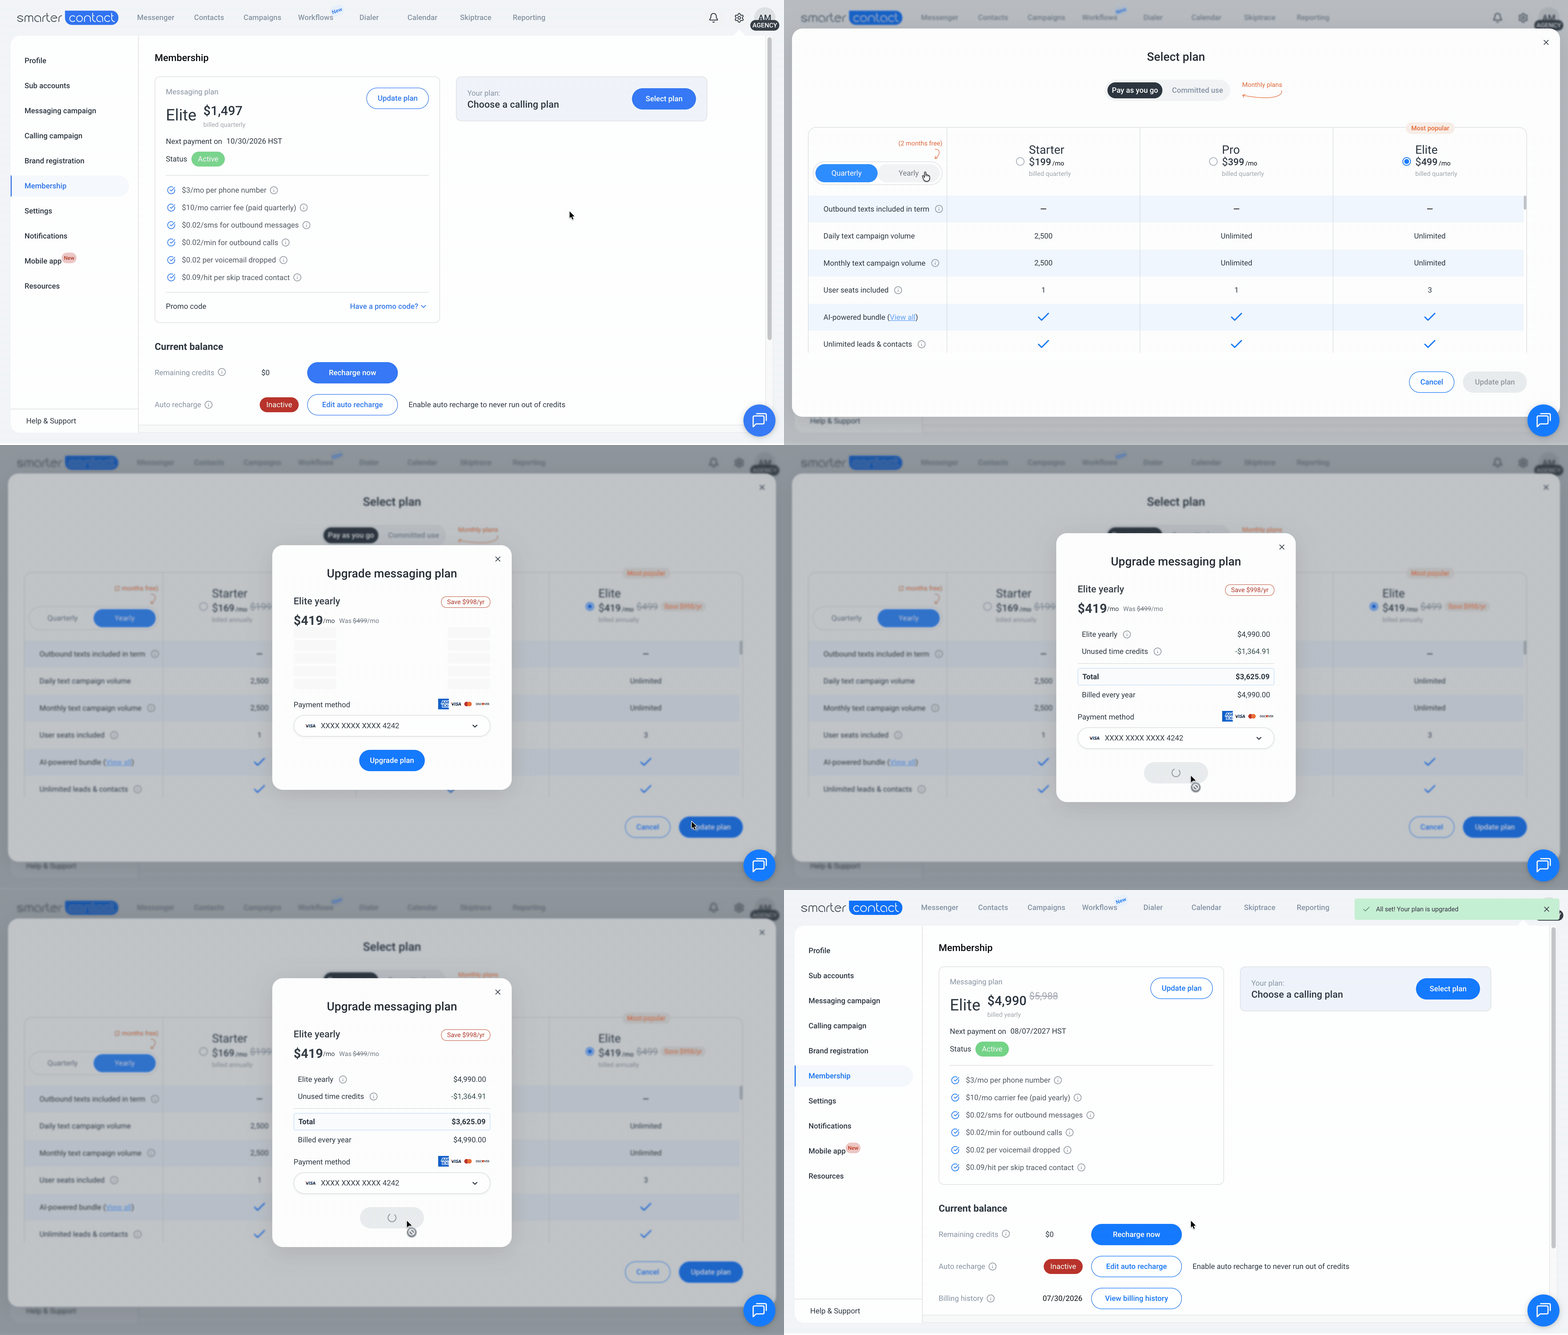
A confirmation pop-up appears summarising what you are about to start. Confirm to proceed.
Step 5: Complete Your Purchase
What happens next depends on which route you take.
Starting a 7-day trial
When confirming your plan, you can choose to start your 7-day free trial. You get immediate access to upload contacts, create labels and quick replies, or even run Data Enrichment.
On the last day of the trial, your card is charged automatically for the plan you selected, and billing recurs monthly, quarterly, or yearly depending on the term you chose. To avoid the charge, cancel before the 7 days are up.
For more detail, see Starting Your 7-day Trial.
Purchasing immediately with a promo code
Applying a promo code skips the trial and gives you immediate access to all features. You confirm the charge at that point and your subscription begins right away.
What You Will Be Charged
Smarter Contact uses a hybrid model that combines a subscription fee with usage-based charges. Your plan gives you the feature set and the rates. What you send and dial on top of that is billed separately.
Usage charges include:
- Outbound texts
- Outbound calling minutes
- Voicemail drops delivered
- Phone numbers, billed monthly per number
- Data Enrichment, billed per record enriched
- Additional user seats
Rates improve as you move up tiers, and improve again on committed use plans. Current rates for every plan are listed on the Pricing page and at the top of your Membership page.
ⓘ Note: 10DLC registration is required before you can send text messages in the US. This is the process of registering your messaging campaign with mobile carriers through The Campaign Registry. There is no third-party registration step with Smarter Contact.
Not sure which plan fits? Book a call with our team and we will walk you through it.